A high-powered car stereo can easily exceed what a single starter battery can supply, especially with the engine off. In these cases, adding an extra battery for your car audio system (a second car battery dedicated to audio) isolates the sound system from your starter battery. Modern lithium car audio batteries (LiFePO4) are often used for this purpose, as they store far more energy than a small capacitor and provide stable voltage for amplifiers. This guide explains when and how to install a second battery and isolators, and offer expert tips for a safe, effective dual-battery setup.
When to Add a Second Battery for Car Audio
A second battery is most useful when your audio system draws a lot of power or runs for long periods with the engine off. For example, large amplifiers, subwoofers, or hours of engine-off use can drain a single battery quickly. If “voltage sag” (lights dimming or amp cutout) or a dead starter battery become problems, a dual-battery setup is a smart solution, and other simple way to boost performance is to replace your starter battery with a dual purpose battery, a high capacity dual-purpose battery can simultaneously solve the problems of running time and car starting. However, smaller or short-term setups may not need an auxiliary battery or isolator; modest systems that are only used briefly usually run fine on one battery.

Battery Matching: Two New vs Adding to an Old One
For best performance and battery life, both batteries should be the same brand, voltage, capacity, age, and model. Never mix a new battery with an old, weaker one. Unequal batteries will unbalance charging and discharging, causing premature wear on the weaker battery. WattCycle advises using“two identical deep cycle packs same brand, group, and production date to prevent uneven wear”,because mixing different brands of LiFePO4 batteries in a system may cause state of charge (SOC) imbalances. If you already have an older audio battery, consider replacing both to ensure they match. If you must use one existing battery, a hybrid setup with a proper isolator/VSR can keep them separated when not in use, but matching is still ideal.
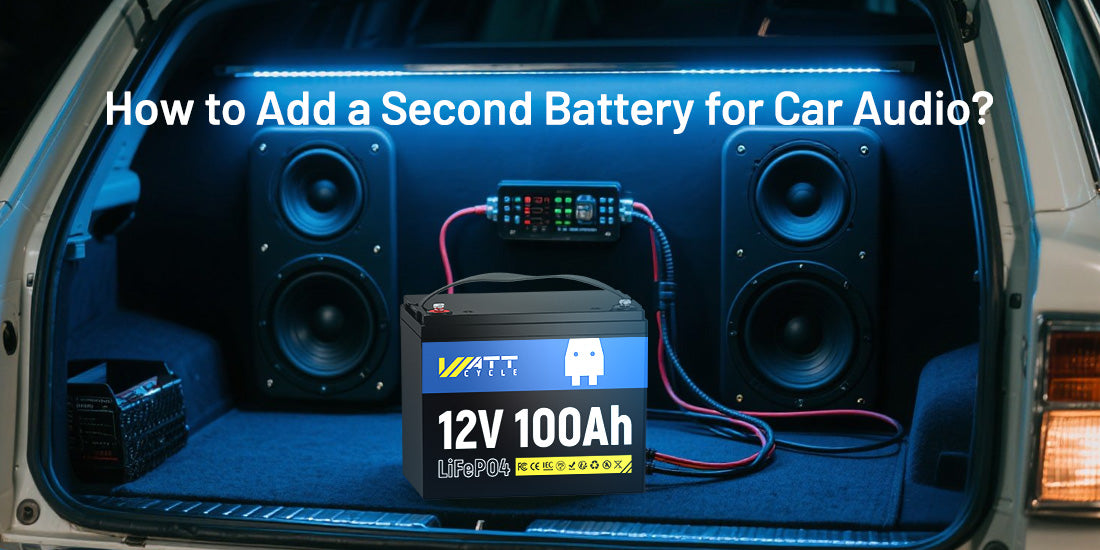
Step-by-Step Guide to Adding a Second Battery
1.Create a Car Audio Battery Wiring Diagram
- Sketch the layout: Show battery locations, isolator / DC-DC charger, fuse positions, cable runs, and amplifier connection.
- Label components: Mark positive/negative terminals, fuse sizes, cable gauges, and ground points.
- Verify flow: Ensure charging path (alternator → main battery → isolator → aux battery) and audio power path (aux battery → fuse → amp) are clear.
- Use software or printouts: A clear diagram prevents mistakes and speeds installation.

2.Plan & Gather Components
- Battery: Choose a deep-cycle LiFePO4 battery (e.g. WattCycle 12 V 100 Ah) matching your primary battery’s specs.
- Isolator: Voltage-Sensitive Relay (VSR) or DC-DC charger rated ≥ 200 A.
- Cables: 1/0 AWG or 2 AWG heavy gauge battery cable (positive & negative).
- Fuses: Inline ANL fuse holders + appropriate ANL fuse (e.g. 300 A) within 6″ of each battery’s positive terminal.
- Battery box/tray: Non-conductive, ventilated, sized to fit your battery.
- Terminals & hardware: Quality battery terminals, ring connectors, cable lugs, stainless bolts, nylock nuts.
- Tools: Wrenches, wire cutters, crimping tool, multimeter, safety gear (gloves, goggles).
3.Select & Prepare Location
- Trunk or under-seat: Ensure at least ½″ clearance above terminals; avoid heat zones (exhaust, engine).
- Ventilation: Use a vented battery box if lead-acid; LiFePO4 sealed—box mainly prevents shorts.
- Mounting: Bolt tray to solid structure. Use rubber isolators or pads to reduce vibration.
4.Pre-Charge & Match Batteries
- Fully charge both batteries to 100 % SOC before wiring.
- Confirm identical model, capacity, age, and production date to prevent state of charge (SOC) imbalances.
5.Disconnect Primary Battery
- Safety: Disconnect negative (–) terminal first, then positive (+).
- Verify: Use a multimeter to ensure no voltage on cables before proceeding.
6.Install Ground Cable
- Run heavy-gauge negative cable from auxiliary battery (–) to a clean chassis ground.
- Sand paint away at grounding point; use star washer for metal-to-metal contact.
- Torque terminal to manufacturer spec (usually ~10 ft-lb).
7.Fuse & Connect Positive Leads
- Mount ANL fuse holder within 6″ of each battery’s positive terminal. Use heat-shrink on all crimps.
- Connect positive (+) of main battery → isolator input; auxiliary battery (+) → isolator output.
- If no isolator: directly connect + to + with heavy-gauge cable.
8.Mount & Wire the Isolator
Secure VSR/DC-DC charger near main battery or alternator.
Wiring:
- Main battery (+) → isolator “IN” terminal (fused).
- Aux battery (+) → isolator “OUT” terminal (fused if recommended).
Control: Some isolators require an “IGN” trigger wire to sense engine-on—tap into ignition-switched 12 V.
9.Connect Audio Amplifier
- Run a dedicated power wire from aux battery (+) through inline fuse to amp’s +12 V input.
- Ground amp’s terminal to the same chassis ground point as batteries.
- Use cable grommets when passing through firewall or sheetmetal.
10.Secure & Protect All Cables
- Bundle cables with nylon ties; keep away from moving parts or sharp edges.
- Cover terminals with insulating boots.
- Label cables (“Main +”, “Aux –”, “Amp +”) for future troubleshooting.
11.Reconnect & Test System
- Reconnect primary battery: positive first, then negative.
- Start engine: measure voltage at both batteries—should read ~13.8–14.4 V.
- Turn off engine: aux battery should hold ~12.6 V under no load.
- Play audio at high volume: observe voltage sag at amp and battery—should remain above ~12.0 V.
- Verify isolator operation: with engine off, main battery stays at rest while aux supplies audio.

When Do you Need Battery Isolator for Car Audio
A battery isolator (or automatic relay) is often used in dual-battery audio systems to manage charging and prevent one battery from draining the other. The key reasons to use an isolator are:
- Prevent Starter Battery Drain: The isolator directs audio loads to the auxiliary battery, so your car’s primary battery always has enough charge to start the engine.
- Charge Management: It ensures both batteries receive proper charge from the alternator without back-flow between them. This is crucial when you have high-powered amplifiers and subwoofers that draw heavily.
- Safety (No-Strand): By separating the batteries, an isolator“removes the issue” of running down the main battery and avoids leaving you stranded.
However, for moderate audio systems or short usage, an isolator may not be necessary. If you only play music with the engine on or for brief periods, a single battery or a simpler setup could suffice. In contrast, if you have a high-performance audio rig or frequently run music with the engine off, a dual battery kit with an isolator is strongly recommended.
How to Install a Battery Isolator for Car Audio
Installing a voltage-sensitive relay or electronic isolator properly is critical:
- Mounting: Place the isolator close to the primary battery or alternator for best performance. It should be in a dry, ventilated spot.
- Wiring: Connect the isolator’s input to the positive terminal of the main (starting) battery (use an appropriately rated fuse near the battery). Connect the isolator’s output to the positive terminal of the auxiliary (audio) battery. This setup charges both batteries when the alternator is running but prevents the auxiliary from drawing power from the main battery when the engine is off.
- Grounding: Ensure both batteries share a common ground (chassis). The isolator itself typically does not require a separate ground beyond the battery connections.
- Fusing: In addition to the main battery fuses, you may use a fuse on the line to the second battery if recommended by the isolator manufacturer. Always follow the isolator’s installation instructions.
WattCycle notes that using a VSR or isolator creates“separate circuits” for the two batteries, preventing cross-drain. After installation, test with the engine on to confirm both batteries are charging and the audio plays without dipping voltage.

Placement and Safety Precautions
Safety and proper placement are essential for any battery installation:
- Ventilation & Clearance: Mount batteries on non-conductive trays and avoid enclosed hot zones. WattCycle suggests keeping at least ½″ clearance above terminals and using ventilated trays. Do not place batteries near exhaust pipes or heat sources.
- Secure Mounting: Batteries must be firmly bolted down. In a vehicle, use hold-downs or straps to prevent movement in a crash.
- Fusing: Always fuse close to the battery on every positive cable to protect against shorts.
- Protection: Wear gloves and eye protection when handling batteries. Avoid any metal tools crossing battery terminals. Disconnect the negative terminal first to reduce short risk, and reconnect it last.
- Battery Type Precautions: If using a lead-acid battery, ensure the vent caps are secure and vented to avoid gas buildup. For lithium batteries, ensure the BMS is enabled and follow manufacturer guidelines (WattCycle batteries are sealed and require no ventilation for gassing).
- Check Polarities: Double-check that positives never touch chassis or negative cables. Even a small spark can cause fires with heavy battery cables.
Following these precautions will help prevent accidents and ensure your dual-battery system is reliable.

Second Battery vs Capacitor: Which Is Best for Audio
A common question is whether a large capacitor can substitute for a second battery. In short: only for very short power spikes, not long-term use. A capacitor simply buffers quick peaks and has very limited storage; it cannot sustain the power demands of a high-powered audio system when the engine is off. Serious audio setups usually need a specialized battery rather than a capacitor. In fact, you need a specialized audio battery to replace your old capacitor and, more often than not, a lithium car audio battery. Use a capacitor only if you have relatively modest bursts of power draw and want to slightly smooth voltage spikes. For long runs, sustained bass, or powerful amps, an auxiliary battery is the better solution.


1 comment
Comprehensive guide! Clear wiring diagrams, component lists, and safety tips make upgrading audio systems straightforward. Highly recommended!